- A long ribbon or material
- A pair of scissors
- Needle and thread
Popular Posts
-
2 February: P rincess Marie attends a guided visit of the Badia Fiesolana 1 February: Princess Marie attended a guided visit of the Muse...
-
Welcome ceremony for Sheikh Hamad Bin Khalifa Al Thani and Sheikha Mozah Bint Nasser Al Missned Sheikh Hamad Bin Khalifa Al Thani and Sheik...
-
With just two days left before the world will be treated to the pomp and pageantry of the ancient ritual of horse-drawn carriages, glass cou...
-
With just three days before the royal wedding of Prince William of Wales, let's take a look back on the weddings of Princes and Princess...
-
wedding anniversary messages A mixture of emotions depicted anniversary. Any plans for extravagant parties, holiday parties, some of the oth...
-
Celebrating Prince William and Kate's Royal Wedding in Shanghai In just a little over two weeks, the wedding of the decade (century even...
-
Artis Cantik Marshanda dan mantan VJ MTV Ben Kasyafani dalam foto. Mantan VJ MTV, Ben Kasyafani, dan artis Marshanda melangsungkan pernikaha...
-
Mother's Day Cakes Mother's Day Cakes Mother's Day Cakes Mother's Day Cakes Mother's Day Cakes
Fashion DIY project #2 : A flower head band
RETRO-LY BLUE..
Hi precious readers,
I would like to thank all people who visit my site. I appreciate all of you and your comments.
In this post, the theme is blue and retro. I think the half jacket
I'm wearing gives the retro vibe and considering how old it is, that
vibe is pretty much authenitic.
posing for these photos was fun and made me feel like a pro model, which I am, for my blog anyway. I hope you like em..
what's the deal with the water dispenser?? That was my way of styling the shoot and I felt it complemented the blue outfit.
love these blue shoes, they are so cute.
I wore a pearl necklace around my wrist. Remember the time I wore a purple belt as a bracelet?
I believe everyone one is entitled to their own opinion so whats yours? Gimmie feed back..
In other news, expect a DIY post coming soon. I will be posting on how to weave a long necklace into a chunky bracelet..
I thought I'd share a joke I found hillarious, this is easily my best joke, funny every time.
A
woman got on a bus holding a baby. The bus driver said, “That has got
to be the ugliest baby I’ve ever seen!” In a huff, the woman slammed
her fare into the fare box and took an aisle seat near the rear of the
bus. The man seated next to her sensed that she was agitated and asked
her what was wrong "The bus driver just insulted me!” she fumed. The
man sympathized and said, “Hey! He’s a public servant and he has no
right to insult the passengers.” "You’re right!” she said. “I think you
should go back up there and give him a piece of your mind.” The man
said. “Here, I'l hold your monkey for you!”
!!Happy holidays everyone!!
XoXo
StYl.
WHEN YELLOW CHECKS OUT..

First I have to say that I can't believe Im conforming in this way. I always dissed fashion blogs as having bloggers who posted lots of pictures of themselves in the same outfit with little or no variation in facial expression. Well, the time has come for me to dive in with the crowd.
If you cant beat them join em?? I dont know, you tell me.
I love this yellow checked skirt that im wearing. I saw it one day on my way home and I had to have it. The black and yellow top is customised, it looks nothing like the original. I love customising stuff to suit my style. ( for DIY tutorial on Ruched sleeves visit this post.)
I accessorised with gold accessories to complement the yellow.

facial variation..

Maybe I should just add that the red skinny belt worn here is one of my favs and I think it does a good job breaking up the yellow. :)
thats me,
StYl.
BELTED UP. HOT OR NOT??

Here is a close up..

One of my friend was in awe, her coments, " you are very special, Is that a belt you're wearing as a bracelet??"
What are your thoughts? Do you think it's hott or nott?? Be the judge.
XoXo
StYl.
WHEN I'M FEELING DOWN.
I hope you are having a lovely week. I am in the middle of my exams and my stress levels are at an all time high. Last minute studying, finishing up on assignments and bla bla bla boring stuff.
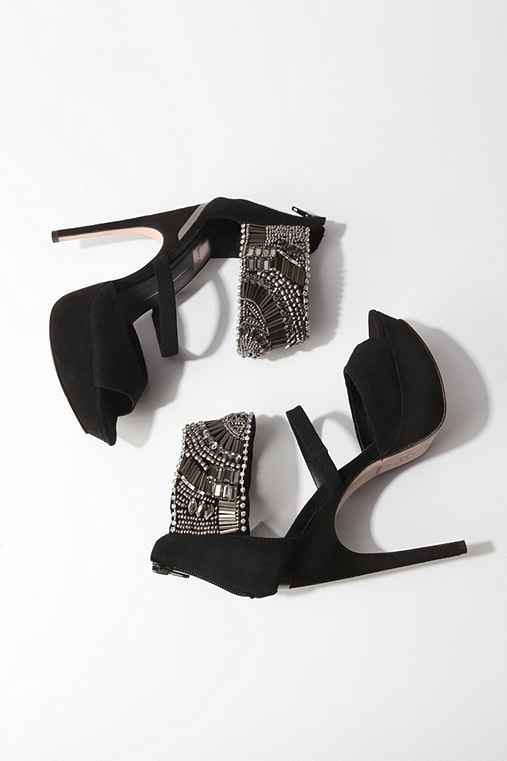
Cut to the good part. High heels.. I love them and when I'm feeling down, nothing boosts my confidence like a pair nice of heels..
When you're feeling low, wear high.... he he.
So anyway taking a break from studying I came across these Dolce Vita jeweled heels.

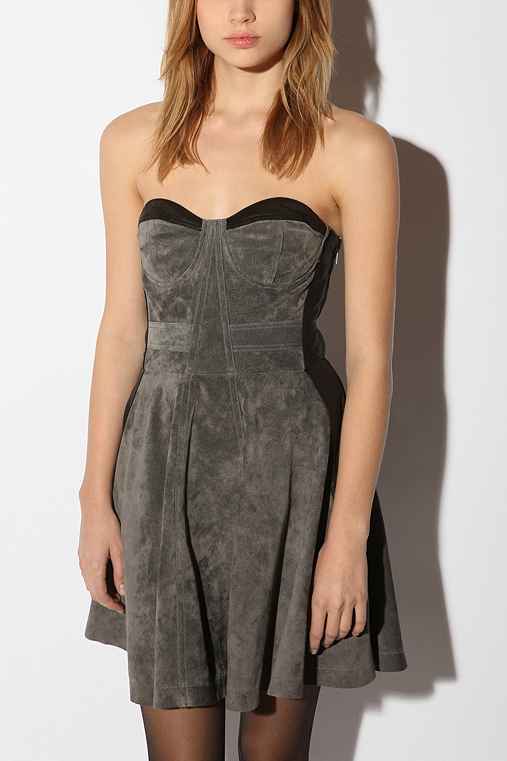
which Id probably wear the with this dress,

It's velvet and I love the colour.
And top it off with this lovely hat.

Yeah, I know, Its got a brown band. That's why Id wear it :)
( All items courtesy of UrbanOutfitters.com )
XoXo,
StYl.
THE LEMON THERAPY
Things you will need:
- 1 mid sized to large lemon
(sliced to three pieces, two ends and a middle slice) - Your favourite body scrub
- A basin with warm soapy
water. - Pumice stone
- A comb
- A towel
Step1: face and neck
Take the middle slice of the lemon and rub it all over your face
and neck paying special attention to areas with skin discoloration or scars.
Let the juice sit for 5-10 minutes. If you have sensitive
skin, do not leave the juice on your face for more than 5 min.
Rinse with luke-warm
water. Follow up with your favourite facial scrub to exfoliate your skin. Do
not forget your neck. This is a part of the body that is often neglected yet it
is always on display. (-you know you love those low tops with plunging
necklines. Did you stop to realize that your neck was also part of the show??)
Benefits:
Lemons contain vitamin c which is a mild acid. This helps in reducing the appearance of scars and dark patches and as a result evens out your skin tone.
Note: this is not a bleach.
It loosens the top layer of dead cells making them easier to
remove and thus revealing the beautiful youthful skin underneath.
Step 2: under arms
Use the same middle slice and rub it all over your armpits.
Make sure to go all over the under arm not just the pits. Leave the juice on.
Benefits:
Have you ever looked at your armpits in the mirror and tried to curse those shadows away?? Well, worry no more. The above procedure is sure to improve the appearance of those dark patches leaving you with beautiful lighter under arms. So next time you want to jump for joy you wont have to stop mid air to put your hands back down secretly hoping no one saw the horror that lies beneath.
The other benefit is that it leaves you with a lingering freshness and fights odours.. (even that stubborn whiff of stink that wont go away, consider it history.)
Step 3: elbows and knees
Take one of the remaining end pieces and squeeze it while rubbing it over your knees and elbows. Leave it on for 5 to 10 min. Without rinsing apply your favourite body scrub and slough the dead cells away.
Benefits
Reduces the appearance of dark patches and loosens dead cells making them easier to remove.
It also softens the skin leaving you with soft and smooth
elbows and knees.
Step 4: hands and feet
I’m sure by now you are wondering what the basin of warm soapy water was for, you are about to find out.
Squeeze the same piece of lemon to extract the juice into the basin of warm soapy water. Dip your hands and feet in it and soak them for 15 to 20 minutes.
For a serious case of ashy feet soak them for 30 minutes.
Use the pumice stone to scrub off the top layer of dead cells.
Benefits:
This therapy helps to soften the dead cells (often called ash) and make them easy to scrub off.
It also helps to soften the skin giving you soft hands and
feet.
It fights odour leaving your feet fresh.
Step 5: hair care
Comb out your hair from the back of your head to the front.
(This is recommended to boost blood circulation and improve flow of nutrients necessary for healthy hair.)
Before washing, make small partings in your hair. Take the remaining piece of lemon and squeeze the juice into the scalp. Do this all over
your head.
Massage the scalp.
Benefits:
This procedure makes dead cells (read dandruff) loose and easy to remove when washing for a clean healthy scalp.
It also provides the hair with vitamin c through the pores in the scalp for a healthy head of hair.
Step 6: shower.
Now, head straight to the bathroom for a relaxing shower (or
bath). Wash off all the stickiness and dead skin to reveal the new you.
Was this post helpful? Are you going to try out the lemon
therapy?? You are welcome to post your comments below.
DIY- Ruched sleeves
These sleeves give even the most drab outfits an interesting twist, call it a splash of style.
Bold ruched sleeves help balance wide hips and to camouflage thick upper arms.

How to make your own ruched sleeves.
Level of difficulty: Easy
You will need:
- A garment with sleeves
- Needle and thread
- A pair of scissors
- A piece of chalk or marker
- Tape measure
step 1: Identify an item of clothing that you wish to jazz up with ruched sleeves.
This could either be a top, blazer or a dress. It should have a considerable length of sleeve and the sleeves should be considerably wide.
step2: Turn your garment inside out. Lay the sleeve on a flat surface ( I like to use our kitchen table). Mark a line, approximately half an inch (or less depending on the width of the sleeves) from the outer end of the sleeve from the lower edge up to about 2 inches from the shoulder seam. This will give a puffy shoulder effect. You can go all the way to the seam if you like.

step 3: Thread you needle and knot it at the end all set for action. Do a neat line of running stitches about this size ( ____ ) along the marked line. You should come up with something like this,

Running stitches- the easiest way to explain these is to call them in and out stitches, run your needle in and out along the line.
step 4: Once at the end of the line hold the thread taut and gently scrunch the fabric down the thread to form creases along the entire length. Now make a few tiny loops to secure the thread and prevent it from coming off then cut it.


step 5: Turn your garment right side out to reveal your new self designed ruched sleeves. Its really that simple. :)


(The other sleeve in un ruched for contrast.)
Kudos for a job well done.
This exercise is bound to leave you feeling proud of yourself.. Go ahead, why don't you try it.
xoxo,
Styl.
Stressful Day
Follow me on twitter for updates..


